Description
Just like the ice cream truck treats you remember, these Strawberry Shortcake Popsicle Bars are full of nostalgic flavor! Made with just 4 ingredients, this simplified, Good Humor-inspired recipe will be a crowd pleaser. They’re totally vegan and gluten-free!
Ingredients
Units
Scale
- 2 pints vanilla ice cream, vegan if necessary
- 1 box strawberry pure fruit popsicles (the square ones)
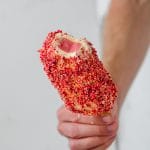
- 1 bag freeze fried strawberries
- 3 cups vanilla wafer cookies, vegan/gluten-free if necessary
Instructions
- Remove your ice cream from the freezer and let it begin to soften while you prepare a sheet tray or rectangular plate. This will need to fit in your freezer, so think accordingly! It will need to accommodate all four of your strawberry shortcake bars. I used a metal sheet tray which I would recommend as it stays very cold! Once you have a tray or plate, line it with plastic wrap or BeesWrap completely, until covered.
- Using a knife or offset spatula, spread one of the pints of ice cream across the bottom of your lined tray. This will be one side of your bar. Try to keep the shape rectangular, about 8 inches by 16 inches. This may vary depending on the width of the popsicles you’re using.
- Unwrap your popsicles and place them down on top of the ice cream layer, on the edge so that the sticks are hanging over the edge. Now, carefully begin folding your slightly softened ice cream over top of the popsicles, smoothing as you go. This does not need to be perfect! Imagine you’re trying to envelop each popsicle evenly in the ice cream, like wrapping a present. Smooth the top of the ice cream so that it’s fairly even. You may need to open the second pint of ice cream for extra coverage. We will be trimming the edges later so those don’t matter as much. Just try to make sure no parts of the popsicle are exposed. Once finished, stick the entire tray in the freezer and let set for at least an hour, preferably 2.
- White ice cream bars are re-freezing, it’s time to make the topping. If you have a food processor or blender, combine the strawberries and wafer cookies and pulse until small, evenly-sized pieces form. If you do not have this equipment, feel free place wafers and strawberries in a sealed bag and smash by hand. A rolling pin can be helpful here. The key is to insure the pieces of your coating are fairly similar in size, as pictured. Set aside.
- Once frozen solid, remove ice cream bars from the freezer. Working quickly, use a sharp knife to slice the bars into even rectangular shapes. Trim ice cream from around the edges so that the stick is easily grabbed. Re-freeze remaining ice cream on tray for another time.
- Pour crumb coating onto a plate. Once bars are sliced, dip one at a time into the wafer/strawberry topping, carefully pressing the coating into the sides of the bars so that it sticks. Pressing will help it better adhere. Once bars are fully coated, place on plate and stick back in freezer for 15 minutes or so to firm up. Serve cold of course!
Notes
For an eating tip, I do not recommend biting directly into these bars. They’re much easier enjoyed licked like an ice cream cone. The brand of popsicle you buy may be a little hard to stick your teeth into, as a warning!
- Prep Time: 10 minutes
- Category: Dessert